


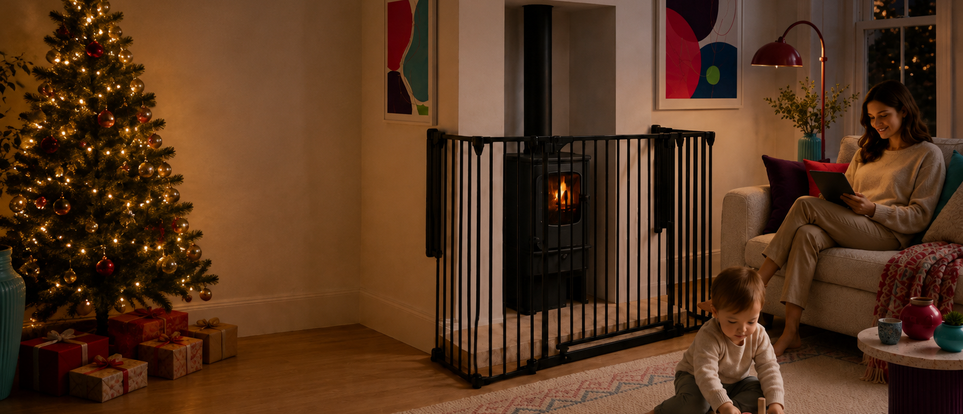
A fireplace or stove can be one of the nicest features in your home — until your baby starts crawling.
Suddenly it is not just the flames or hot stove that you notice. The stone, marble or tiled hearth itself can be one of the hardest and most unforgiving surfaces in the room, often with corners and edges right at toddler height.
A properly fitted baby fireguard can create a protected area around both the heat source and the hearth. But choosing the correct size involves more than simply measuring the width of your fireplace.
View our full Baby Fireguard range:
https://www.babasafe.co.uk/baby-products/baby-fire-guards.html
With a modular fireguard, you need to think about width, depth, panel configuration, bracket position, distance from the heat source and the overall shape of the installation.
Here is how to work it out.
1. Start with three measurements
Measure the following in centimetres:
- The total width of your hearth
- The depth of your hearth
- The distance from the heat source to the outer edge of the hearth
The width and depth help you identify which fireguard configuration is likely to fit.
The distance from the actual fire or stove helps you decide whether that configuration will provide enough clearance from the heat source.
Measure the whole hearth — not just the fireplace opening
This is important.
Ideally, your fireguard should sit outside the hearth, rather than on top of it.
A raised stone, granite, marble or tiled hearth can be a significant hazard in its own right. A young child can fall against a hard edge or corner without ever touching the fire itself.
So when measuring, think about the complete area you want your child kept away from.
2. Understand how the panels create the shape
Most standard fireplace installations use a five-panel BabaSafe MultiFit Fireguard.
This normally means:
three panels across the front
and
one panel running back towards the wall on each side.
The centre front panel is normally the 90 cm walkthrough gate.
For example:
30 cm panel + 90 cm gate + 30 cm panel
across the front gives a nominal front width of:
150 cm
The remaining two panels then create the depth on either side.
But this is only one possible configuration.
Some fireplaces only need three panels
Certain fireplaces and stoves can be protected very neatly using a three-panel configuration.
A corner stove is a good example.
If the stove and hearth are already positioned against two walls, you may not need a conventional five-panel guard wrapping around both sides. A three-panel arrangement can sometimes create the required protected area while using the existing walls as part of the layout.
The same basic rules still apply:
- protect the complete exposed hearth
- prevent the child reaching the fire or stove
- maintain suitable distance from the heat source
- make sure both ends have suitable wall-fixing positions
Hearth running into a corner? An L-shaped guard may work
Some fireplaces have a hearth that runs directly into the corner of the room.
In this situation, trying to create a conventional rectangular fireguard may make little sense.
The MultiFit can often be configured into an L-shaped barrier, protecting only the exposed sides of the hearth while the walls themselves complete the protected area.
This can produce a much neater installation and prevent unnecessary panels projecting into the living room.
The shape should follow the hazard
The important point is not to assume that every fireplace needs five panels arranged in a rectangle.
Depending on your room, the best solution may be:
- a standard five-panel configuration
- a three-panel configuration
- an L-shaped guard
- an angled or trapezoid-style layout
- a larger extended guard
- a completely custom combination of panels
The BabaSafe system is modular because fireplaces and hearths come in so many different shapes.
Start with the area that needs protecting, then build the fireguard shape around it — not the other way around.
3. Don't size a fireguard by total perimeter alone
This is one of the most important parts of sizing a modular fireguard.
Just because the total length of all the panels appears to match the perimeter of your hearth does not mean the fireguard will fit.
You need enough panel length in the correct places.
A configuration may have more than enough total panel length but still fail because:
- the front panels do not provide enough width
- one or both side panels are too short
- too much of the available length is being used across the front
- the brackets need to be fitted further back than expected
- the left and right sides of the fireplace require different depths
Always check separately:
Front width
Left-side depth
Right-side depth
Wall-bracket position
Think of fireguard sizing as geometry, not simply perimeter.
4. Choose the configuration that most closely matches your hearth
For the neatest installation, start with the configuration whose width and depth most closely match the area you need to protect.
On a typical five-panel installation:
Three panels normally create the front width.
One panel on each side normally creates the depth.
But as we have seen, corner fireplaces and unusual hearths may require a completely different arrangement.
It is generally better for the fireguard to sit slightly outside the hearth than to leave part of the hearth accessible.
However, do not concentrate so much on achieving a neat fit around the stonework that you forget about the actual fire or stove.
You must also consider heat clearance and your child's reach.
5. Use the panel angles to create the right shape
The BabaSafe MultiFit does not have to form a perfect rectangle.
The joints between the panels rotate and lock at the angle you choose, allowing you to alter the finished shape of the fireguard.
This can help when:
- your hearth is not perfectly square
- the chimney breast is narrower than the nominal guard width
- the left and right sides are different
- the wall-bracket positions are unusual
- the hearth runs towards a corner
- you want the fireguard to follow the fireplace more neatly
- you need to improve stability on a wide configuration
Angling a panel changes the straight-line distance between the wall brackets even though the physical panel length itself has not changed.
Angles can also improve stability
This is especially important with larger configurations.
Putting several articulated panels into one long, completely straight line can allow more lateral movement.
Creating a slight shape — for example by angling the outer sections backwards — can give the fireguard a more stable footprint.
So do not automatically assume that the straightest-looking configuration is the best one.
A subtle angled or trapezoid-style shape may both fit the fireplace better and reduce movement.
6. Check the distance from the fire or stove
Once you have found a configuration that fits around the hearth, check how far it will sit from the actual heat source.
There are two separate issues.
Can your child reach the heat source?
Your child must not be able to reach:
- through the vertical bars
- around either side
- over the fireguard
- towards a projecting stove from an angle
Children vary considerably in height, reach and ingenuity, so there is no single distance that can guarantee suitability for every child.
Look at the completed installation from your child's position.
If they can reach the fire, stove or another dangerously hot surface from any direction, the protected area needs to be increased.
Can the fireguard itself become too hot?
The fireguard is made from metal and will absorb radiant heat.
As a precautionary starting point, our instructions recommend approximately:
75 cm from a stove
and
90 cm from an open fire.
These are precautionary guidelines rather than universal guarantees.
Every fire is different.
A small stove burning gently can behave very differently from a high-output stove running strongly for several hours. Likewise, the radiant heat produced by one open fire can be significantly greater than another.
In some installations a shorter distance may remain safe.
In others, more than the suggested distance may be required.
When first using the fire after installing the guard, check the panels periodically during realistic use.
Pay particular attention to:
- the front panels facing the heat
- side panels beside projecting stoves
- areas receiving concentrated radiant heat
If any part of the fireguard becomes excessively hot, stop using that configuration and increase the distance from the heat source.
Always follow the instructions supplied with your stove or heating appliance as well as the fireguard instructions.
What if the fire is never used?
Many parents use a fireguard even when they do not intend to light the fireplace or stove.
In that situation, the main reason for fitting a guard may simply be to prevent access to:
- the hard hearth
- sharp corners
- the stove body
- soot, ash and dirt
- the fireplace opening
If the fire genuinely will not be used, heat clearance is obviously no longer the determining factor and you can concentrate on obtaining a neat protective fit around the physical hazards.
7. Don't forget the side clearance
It is very easy to concentrate entirely on the width across the front.
But with many stoves, the side distances matter just as much.
A stove projecting into the room can radiate significant heat sideways as well as forwards.
Your side sections therefore need to be long enough to:
- clear the hearth
- prevent access from either side
- maintain appropriate distance from the heat source
- reach the intended wall-bracket positions
This is particularly important with freestanding and partially recessed stoves.
It is also why matching the overall perimeter alone does not work.
You might have plenty of total panel length, but if the individual side panels cannot reach the wall safely, you need a different configuration.
8. Allow for the wall brackets
The wall brackets form part of the finished installation and should be considered before choosing the final size.
They add approximately 5 cm at the wall connection and can be positioned in different ways depending on the chimney breast and available wall space.
For example, they can normally be fitted:
- to the front face of the chimney breast
- or rotated onto the side of the chimney breast
This is particularly useful when the hearth extends almost all the way across the chimney breast and there is not enough clear wall immediately beside it.
If the brackets need to be fitted around the side, make sure your side panels are long enough to reach those fixing points.
Also look for anything that could interfere with the installation, including:
- skirting boards
- gas valves
- pipes
- sockets
- decorative mouldings
- unusual wall shapes
A note about inglenook fireplaces
Do not mount the BabaSafe wall brackets deep inside an inglenook or recessed fireplace opening.
Heat can become concentrated within the recess, and the internal walls may become too hot for suitable bracket positioning.
The fireguard should normally be configured outside the inglenook, with the wall brackets positioned away from the concentrated heat.
If you have a particularly unusual inglenook or deeply recessed stove, use our sizing help service and send us photographs and measurements before choosing your configuration.
9. Some movement in a multi-panel fireguard is normal
This is important to understand before purchasing.
The BabaSafe MultiFit is an articulated multi-panel barrier, not a single rigid welded frame.
The same joints that allow the fireguard to bend into different shapes also mean that some flex and movement is normal.
Movement can become more noticeable when:
- the guard is particularly wide
- several panels are arranged in a completely straight line
- the guard is significantly larger than the hearth
- there is no raised hearth behind the guard to limit movement
- persistent pressure is applied sideways
The hearth often helps naturally
On many installations, the raised hearth sits behind the lower part of the fireguard and naturally limits how far the panels can move backwards.
Where there is no raised hearth, or where the fireguard extends substantially beyond it, that natural restriction is no longer present.
The articulated movement may therefore become more noticeable.
Sideways pressure creates the most movement
Pressure applied towards the fireplace is generally better resisted by the overall shape of the guard and, where present, the hearth behind it.
Persistent sideways pressure can create more movement because the articulated joints are being encouraged to change angle.
This does not automatically mean there is a fault with the fireguard.
What matters is that:
- both ends remain securely fixed
- the guard remains attached to the wall brackets
- the fireguard stays correctly positioned
- movement cannot allow the child to reach the protected area
Use the shape to improve stability
If a wide guard has more movement than expected, the first solution may simply be to reconsider its shape.
Slightly angling sections rather than trying to stretch the entire guard into one long straight line can create a more stable footprint.
This is particularly useful on wide installations.
Floor brackets are available where needed
In the relatively small number of installations where additional stability is required, BabaSafe floor brackets are available.
These can provide extra support at floor level and are particularly useful where:
- there is no raised hearth
- the guard extends substantially beyond the hearth
- a very wide configuration is required
- the particular geometry allows excessive lateral movement
Floor brackets are not necessary for most installations and may not be suitable for every type of flooring.
But they provide another solution where the layout of the room means additional stability is desirable.
10. Don't underestimate the hearth itself
It is natural to think that the biggest fireplace danger is always the heat.
But for a child learning to crawl, stand and walk, the hearth itself can be one of the most significant collision hazards in the room.
A stone, granite, marble or tiled hearth can have:
- extremely hard surfaces
- sharp corners
- projecting edges
- exactly the wrong height for a toddler's head or face during a fall
This is one of the main reasons we recommend surrounding the whole hearth, rather than placing the guard immediately in front of the flames.
The aim is not simply to stop a child touching the fire.
It is to create a protected zone around the entire fireplace area.
11. Height, climbing and nearby furniture
The BabaSafe MultiFit Fireguard is approximately 76 cm high.
But the height of the guard is only one part of preventing climbing.
Do not position objects immediately beside it that could provide a convenient step, including:
- footstools
- chairs
- toy boxes
- baskets
- large toys
Children develop quickly.
An installation that is completely inaccessible to a crawling baby may look very different several months later when that child can stand, climb and move objects around the room.
Review your setup as your child develops.
12. Make sure adults can still access the fire
A fireguard should protect your child without making the fireplace difficult for adults to use.
The BabaSafe MultiFit includes a walkthrough gate, allowing you to access the fireplace for lighting, refuelling and cleaning without removing the complete barrier.
After accessing the fireplace, always make sure the gate is fully closed and locked.
Even the best fireguard cannot protect a child if the access gate has accidentally been left open.
13. Take it down and put it away quickly
A large fireguard does not have to become a permanent feature of your living room.
The BabaSafe MultiFit is designed so that it can be quickly released from the wall brackets without dismantling the individual panels.
Once removed:
- unlock or loosen the panel-angle joints
- fold the articulated sections together
- store the complete guard away
In most configurations, there is no need to separate every individual panel and rebuild the fireguard from scratch each time.
The small wall fittings can remain in place while the main guard is stored away.
When you need it again, unfold it, reset the angles and remount it.
This is particularly useful during the warmer months when the fireplace may not be used for weeks or months.
So if you are tempted to choose a fireguard that is too small simply because you are worried about losing living-room space, remember that the main barrier can be removed very quickly when it is not required.
Some unusually configured guards may need a little more dismantling to fold into their smallest possible storage size, but the modular system is designed to make this straightforward.
14. What if none of the standard sizes works?
That is exactly where a modular system comes into its own.
BabaSafe extension panels are available in different widths, allowing you to increase the width, depth or overall protected area.
This can be useful if:
- your fireplace falls between two standard sizes
- you need greater heat clearance
- your hearth is particularly deep
- you have a corner or L-shaped installation
- you move house
- you replace your stove
- your existing configuration needs to become larger
You can also create a custom configuration using individual panels rather than choosing one of the standard preset sizes.
View our full range of Baby Fireguards, sizes and configurable options:
https://www.babasafe.co.uk/baby-products/baby-fire-guards.html
So purchasing a MultiFit does not lock you permanently into one width and depth.
Final checks before choosing your size
Before ordering, run through these questions:
Have I measured the complete width of the hearth?
Have I measured the depth on both sides?
Have I checked the distance from the hearth edge to the actual fire or stove?
Do the front panels provide enough width?
Are the individual side panels long enough to reach the wall?
Have I checked where the wall brackets will actually be fitted?
Would a three-panel or L-shaped configuration suit my fireplace better than a standard five-panel layout?
Can my child reach through, around or over the guard from any direction?
Is the proposed guard far enough from the heat source?
Would angling the panels create a more stable shape?
Is there a raised hearth behind the guard to limit movement?
If there is more lateral movement than suitable, would floor brackets help?
And remember:
Do not choose a configuration simply because its total perimeter appears large enough.
The width, side depths, panel positions, angles and wall-fixing locations must all work together.
Not sure what size baby fireguard you need?
Fireplaces vary enormously, and sometimes the easiest solution is simply to let us have a look.
If you are unsure which BabaSafe configuration will work for your fireplace, use our Baby Fireguard Sizing Help service.
Send us:
- a photograph showing the complete fireplace or stove
- your hearth width
- your hearth depth
- the distance from the hearth edge to the heat source
- any unusual details about the room or intended fixing positions
Our team can review the photograph and measurements and come back to you with a recommended BabaSafe MultiFit configuration.
This is particularly useful for:
- corner stoves
- L-shaped hearths
- unusually wide fireplaces
- projecting stoves
- asymmetric hearths
- inglenooks
- limited wall-bracket space
- installations that may require extensions
- unusual layouts needing a custom panel combination
Need help choosing the right size? Submit your measurements and fireplace photos here:
https://www.babasafe.co.uk/baby-products/baby-fire-guards.html
The principles to remember are simple:
Protect the whole hearth.
Maintain an appropriate distance from the heat source.
Choose the right geometry — not simply enough total panel length.
And if you're unsure, send us a photograph and measurements and we'll help work out the configuration.